I recently took on a commission job to build a trestle style farm table.(Yes, another one) After a few discussions, we settled on a design with some interesting differences and challenges from what I normally do.


The leg sections, instead of timber or boards, would be rectangular tube steel. The top surface wood would utilize barn boards the interested party had already collected. Since the boards were only 3/4 inch thick, (instead of thicker stuff) supporting them would be some of the challenge.
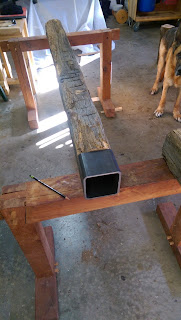
The next few photos show the beam being rough-fitted to the steel sleeves.


I bought kiln-dried White Oak to use for the sub-frame for the barn board top. I selected pieces that were dead straight, and being White Oak will lend weight and stiffness to the top.
 I made pocket mortises where the cross members that would join the legs are fastened, to help ensure weight would transfer


Legs are back from the welder, so before they get painted I'm final fitting the beam to the leg sleeves.


 Square head black oxide bolts I ordered. I think they're fitting for the style of the table.
After planing the backs of the barn board and cutting them to width, I decided I was trying to hard to force them to work. The cupping was to severe to use, and in the long run the customer would grow to dislike glasses being knocked over all the time.
Going to a local sawmill, I found some choice 1x12 kiln-dried stock


The leg sections, instead of timber or boards, would be rectangular tube steel. The top surface wood would utilize barn boards the interested party had already collected. Since the boards were only 3/4 inch thick, (instead of thicker stuff) supporting them would be some of the challenge.
 |
| Dry fitting the leg pieces, and getting the sleeve height correct before bringing them to the welder. The beam is in the background. |
 |
| Sleeves to hold the timber ends. I ordered two sizes initially to ensure the ones used would allow me to "let in" the beam ends |
 |
| Tight old growth grain of the reclaimed beam,(bottom of photo) compared to a newer cut-off from a mill last year |
The next few photos show the beam being rough-fitted to the steel sleeves.


I bought kiln-dried White Oak to use for the sub-frame for the barn board top. I selected pieces that were dead straight, and being White Oak will lend weight and stiffness to the top.
 |
| Jointing one of the pieces |
 |
| Using a shooting board to square the ends of the pieces |


 |
| Glued up and pegged with oak pegs, time to let it sit overnight |
 |
| Cleaning up frame |
 |
| Center beam and top frame ready |
 |
| Cutting dovetails for the barn-board skirt |

 |
| Dry-fitting skirt around top frame |
 |
| Glued, pegged and clamped, just need a final trim |
Legs are back from the welder, so before they get painted I'm final fitting the beam to the leg sleeves.


 |
| Trial fit is good, and frame is sturdy. With only clamps the top frame doesn't flex with my body weight on it. Went ahead and trimmed the skirt since it was in a perfect position and height. |
 |
| Panel gauge to mark board width |

 |
| Squaring base before drilling bolt holes |

 |
| Second coat of primer on |

After planing the backs of the barn board and cutting them to width, I decided I was trying to hard to force them to work. The cupping was to severe to use, and in the long run the customer would grow to dislike glasses being knocked over all the time.
Going to a local sawmill, I found some choice 1x12 kiln-dried stock

 |
| Checking edge joint work |
 |
| Fastening top to frame with Walnut pegs. Not shown in the pic, I clamped each board as I went to ensure the jointed edges were as close as possible. The three wide boards look great |
 |
| Sanded top attached, done except for color and finish. Just waiting for the samples to dry to show the customer. |
 |
| After sanding, stain, another sand and 5 coats of Tung oil, the finish is done. The initial coat of Tung oil was set in the wood with turpentine, and subsequent coats were raw. Well over a quart was used, as pine is pretty thirsty. |


 |

 |
| All set to deliver |
Comments
Post a Comment